
Updates:
- 2022/03/26: published
- 2022/03/03: starting write-up, based on internal documentation
Introduction
As part of getting to know the inner working of a slicer and have a toolkit for advanced non-planar slicer I had in mind, I started to code my own “laboratory slicer” or simply “LabSlicer” as an in-house project.
Its main features are:
- Python-based, it’s slow for production but good enough to test new algorithms
- PyClipper as offsetting & clipping engine
- four stages clearly defined with API and file-format export/import:
- mesh: import & export meshs
- slice: slices 3d objects into 2d slices/polygons
- route: routes polygons with wall/perimeter and infills, bottom/top layers, skirts/brims
- gcode: takes routes and converts into G-code
- LabSlicerCore: slicer available as library, with clear defined & simple API
- easy to extend to non-planar slicing/routing/g-code, incl. 5-axis FDM
Motivation
It may look like redundant to code another slicer and define those rather simple steps as such, but the benefits came days after I finished the basic layout and was able to exchange the mesh and slicing stage with voxel-based engine, or use OpenGL screenbuffer to slice and then hand over polygons to route and gcode stage – within 2-3 weeks I had 3 working slicers with different slicing engines.
By having a clear API the integration into various in-house projects was truly swift and the cross-fertilization paid off quickly and immensely. I might have taken me more time to learn to memorize Slic3r or CuraEngine API than writing a basic slicer myself. Granted that coding a slicer in Python limits its overall performance, compared to an optimized slicer like Cura; but to research and develop new slicing and routing algorithm coding with Python is fast, a couple of hundred lines in Python can represent ten thousands of lines of C++ code, not to mention wait time for compiling.
Four Stages of Slicing
It may appear to be simplistic at first sight, but it’s worth to clearly layout the main stages of slicing:
Mesh
One has to import the geometry such as a mesh which circumscribes a volume.
Slice
The slicing stage takes the geometry and slices it into slices, which are a set of polygons which also describe holes – essentially an array of arrays of polygons.
Route
The real work of the slicer is actually the routing, which means to plan extrusion paths:
- walls or perimeters: offsetting or rather insetting 2D polygons
- infill pattern: offsetting and clipping of 2D polylines
- skirts and brims: offsetting at bottom via 2D polygons
- bottom and top layers, also intermediary: difference & intersecting previous and next layers to determine delta areas (polygons) were, are or becoming bottom/top layers
- support structures (not yet implemented)
Routes are held in an array of arrays of routes (polylines).
Off- and Insetting Polygons
At first sight it looks trivial, but in the details this isn’t trivial at all as offsetting or insetting can clash with itself or other polygons and fork into two or more polygons. Clipper as developed Angus Johnson has laid the ground for many slicers and does the heavy lifting and therefore unloads some of the burden and one can focus on higher level algorithms.
Gcode
At this stage now all the slicing settings like travel and extrusion speeds, retraction and so on are factored in and further optimizations are done, given we know now all routes at a given (planar-)layer.
It’s easier to separate routing and actual creation of G-code as transforming routing, like for non-planar slicing, is more efficient than parsing G-code with more overhead.
From a development point of view the routing results is the most precious and worthwhile data; the other stages are rather simple, but routing is where the magick happens.

History
To give you a bit insight to how I coded it, I started with the API in mind, defined the 4 stages roughly, then the parameters and the data-structures and import/export file-formats, essentially all is encoded in JSON to keep things simple.
Within 2 days I had basic wall routing coded using PyClipper – I had some experience with coding with it at Mandoline (fork) but felt to start from scratch anyway – and I did not even try to slice yet but had a simple function returning the same square (polygon) no matter which slicing height – yes, starting with the simple 20mm cube.
Once I had the routing done, I coded the gcode stage, to create basic extrusion and preview the gcode with a G-code viewer – and added support start- and end-gcode with some sane defaults and sent it to my 3D printer – and the first print outs were bad, no retraction, no infill, single wall, no path/routing optimization.
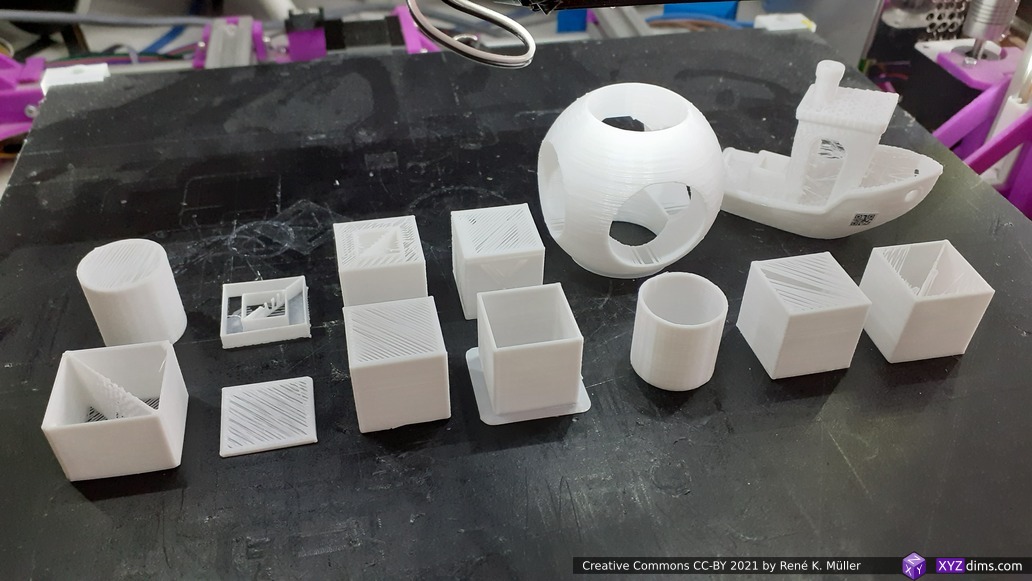
20mm cube with square hole, openscad logo, 3D benchy (retraction not yet coded)
After I matured routing and gcode stage, I focused on the slicing from mesh to polygons, which took most of the time, as I had to decide on the notion how holes are defined in a set of polygons, using clock-wise (CW) and counter-clock-wise (CCW) notion – the code grew quickly complex as I coded those polygon processing from scratch instead to use shapely library right away; but it was good to look so closely at the details, as when one wants to carry metadata of facets of the mesh to the polygon slice and routing stage to the final gcode, e.g. changing color, material or other special G-code, this chain or pipe to hand over metadata had to be possible.
I also kept the file format of routing somewhat open to support easily also non-planar routes, means, the coordinate could be more than x, y, z but also u, v, w (nozzle vector for 4-, 5- or 6-axis FDM) and layer thickness for non-planar slicing.
Cross-Fertilization
- Vox3lSlicer: as I experimented with voxel-based geometries, such as reliable CSG operations when slicing with voxels, I replaced the mesh– and slice-stage with voxel-based functions, and then use the next two stages of route and gcode to create G-code; it was truly a matter of a couple of hours
- VoxGLSlicer: utilizing OpenGL screenbuffer to “render” volume and easily slice within the GL engine, vectorize and feed the polygons into LabSlicerCore; the same, after a few hours I had another slicer
Examples
In-House Slicers
| LabSlicer | Vox3lSlicer | VoxGLSlicer | MetatronSlicer | EnochSlicer |
| – full planar slicer – 4 stages: mesh, slice, route, gcode – experimental – API defined – LabSlicerCore library – import/export data of each stage | – voxel-based planar slicer – fast slicing – uses LabSlicerCore library for route and gcode stage | – OpenGL based planar slicer – fast slicing – uses LabSlicerCore library for route and g-code stage | – non-planar slicer – implements Class 1 + 21) Universal Slicing – uses OpenZCAD2) engine to slice non-planar | – non-planar slicer – implements Class 1 + 21) Universal Slicing – uses mesh & gcode transformation |
Footnotes:
- Class 2 Universal Slicing only partially implemented (status 2022/03)
- OpenZCAD is alike OpenSCAD but with Python as base-language with multiple backends (OpenCASCADE, LibFive, Fogleman’s SDF)
Availability
All three slicers are in-house slicers where I do a lot of experimenting, changing rapidly and testing new algorithms, such as mapping coordinate systems and new routing procedures – for now there are no plans to publish them.
I recommend to look at my fork of Mandoline to learn about slicing, which is available at github but I have stopped to work on, it actually produces printable G-code unlike the original code of it.
References
- MetatronSlicer & EnochSlicer (universal slicers)
- Slicer4RTN (conic slicer)
- Cura CLI Wrapper
- Mandoline (fork)