Note: As of 2023 I started a rewrite Prynt3r in Python, reimplementing Print3r (Perl).
Print3r or print3r (pronounced print-three-r) is a command line tool (CLI) which supports:
- multiple different slicers (Cura, Slic3r, PrusaSlicer, Mandoline, KiriMotoSlicer) with same unified settings
- multiple 3D formats more than what each slicer supports:
- STL, OBJ, OFF, AMF, 3MF, 3MJ and also
- OpenSCAD (.scad), OpenJSCAD (.jscad), ScriptCAD (.sccad)
- FCStd, IGES, STEP and Brep (using FreeCAD2Any helper)
- networked/cloud printing built-in with multiple 3D-printers
Usage
% print3r [<options>] <command> <file1> ...
commands:
print: print the part (and perform necessary conversions to achieve print)slice: just slice the part to gcode with slic3r, slic3r-pe, cura, cura-legacy or prusapreview: preview print as gcoderender: render image of printgcode: send Gcode from command-linegconsole: start Gcode console to interactively send commandsclient: enable remote printing (start client mode)log: query past logged prints
Print (Convert & Slice & Print)
% print3r print cube.scad
% print3r print cube.stl
% print3r print cube.gcode
% print3r --scad print "cube(20)"
Slice (Without Printing)
Just slice the part to Gcode:
% print3r --output=cube.gcode slice cube.scad
% print3r --output=cube.gcode slice cube.stl
Preview (Without Printing)
Preview the resulting Gcode:
% print3r preview cube.scad
% print3r preview cube.stl
% print3r preview cube.gcode
% print3r --scad preview "cube(20)"
Render
Render the Gcode into an image:
% print3r --output=test.png render cube.scad
% print3r --output=test.png --scad render "cube(20)"
% print3r --output=test.png render cube.stl
% print3r --output=test.png render cube.gcode
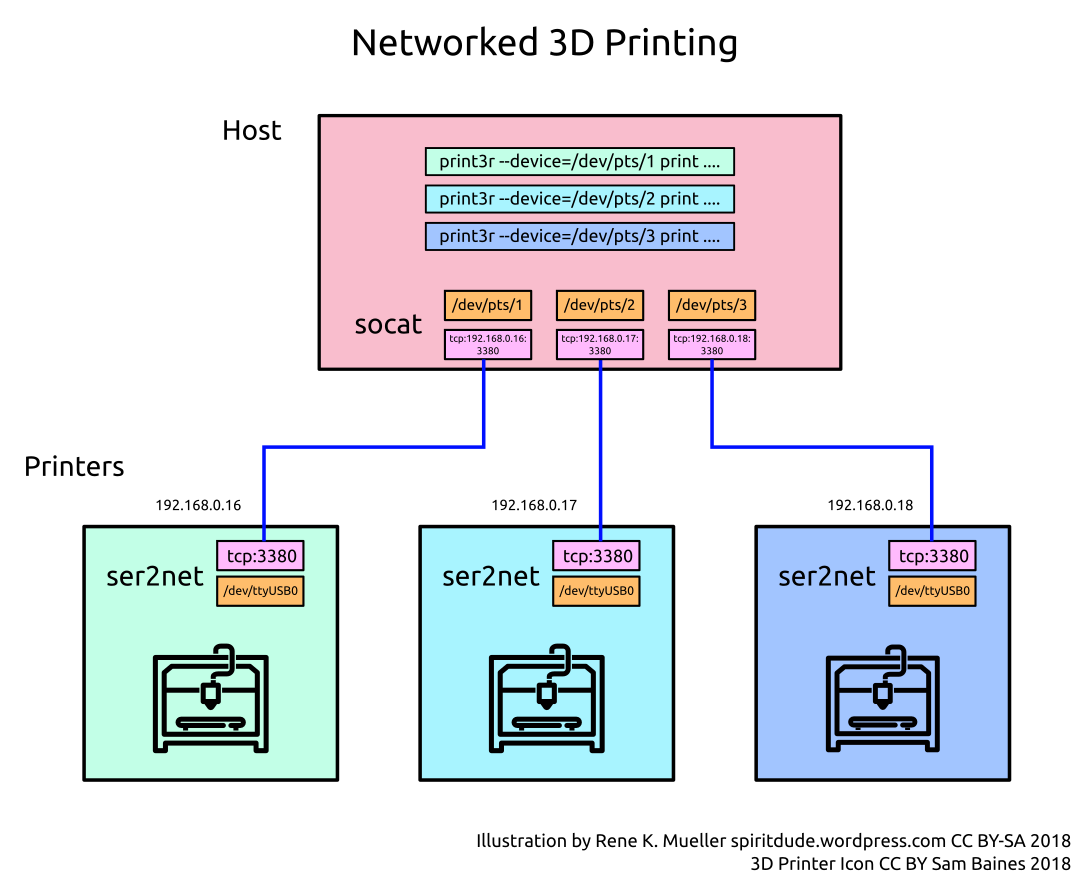
Cloud Printing (Server/Client)
Create a printhub by starting print3r in client-mode:
% print3r --device=/dev/ttyUSB0 client &
% print3r --device=/dev/ttyUSB1 client &
On the another host you can address the printhub(s):
% print3r --device=tcp:192.168.0.23:0 print benchy.stl
% print3r --device=tcp:192.168.0.23:1 print calibrationCube.stl
Usage Overview
Print3r (print3r) 0.2.0 USAGE: [<options>] <cmd> <file1> [<...>]

   options:
      --verbose or -v or -vv  increase verbosity
      --quiet or -q           no output except fatal errors
      --baudrate=<n>          set baudrate, default: 115200
      --device=<d>            set device, default: /dev/ttyUSB0
      --slicer=<slicer>       set slicer, default: slic3r
                                 slic3r, slic3r-pe, cura-legacy, cura, prusa
      --printer=<name>        config of printer, default: default
      --version               display version and exit
      --output=<file>         define output file for 'slice' and 'render' command
      --scad                  consider all arguments as actual OpenSCAD code (not files)
      --scadlib=<files>       define OpenSCAD files separated by "," or ":"
      part preprocessing:
         --random-placement   place print randomly on the bed
         --auto-center        place print in the center
         --multiply-part=<n>  multiply part(s)
         --scale=<x>,<y>,<z>     scale part x,y,z (absolute if 'mm' is appended)
         --scale=<f>             scale part f,f,f
         --rotate=<x>,<y>,<z>    rotate x,y,z
         --translate=<x>,<y>,<z> translate x,y,z
         --mirror=<x>,<y>,<z>    mirror x,y,z (0=keep, 1=mirror)
      --<key>=<value>         include any valid slicer option (e.g. slic3r --help)

   commands:
      print <file> [...]      print (convert & slice & print) part(s) (.scad, .stl, .obj, .gcode)
      slice <file> [...]      slice file(s) to gcode (.scad, .stl, .amf, .obj, .3mf)
      preview <file> [...]    slice & preview (.scad, .stl, .obj, .gcode)
      render <file> [...]     render an image (use '--output=sample.png' or so)
      gcode <code1> [...]     send gcode lines
      gconsole                start gcode console
      client                  map USB connected printer to network (per device)
      help

   examples:
      export PRINT3R "printer=my_printer" --OR-- setenv PRINT3R "printer=my_printer"
      print3r slice cube.stl
      print3r --layer-height=0.2 --output=test.gcode slice cube.stl
      print3r --printer=ender3 --device=/dev/ttyUSB1 print test.gcode
      print3r --printer=corexy --device=/dev/ttyUSB2 --layer-height=0.3 --fill-density=0 print cube.stl
      print3r --printer=ender3 --device=tcp:192.168.0.2 --layer-height=0.25 print cube.stl
      print3r print cube.scad
      print3r --scad print "cube(20)"
      print3r gcode 'G28 X Y' 'G1 X60' 'G28 Z'
      print3r gconsole
      == Print3r: Gcode Console (gconsole) - use CTRL-C or 'exit' or 'quit' to exit
         for valid Gcode see https://reprap.org/wiki/G-code
         conf: device /dev/ttyUSB0, connected
      > M115
      ...
Slicers
Following slicers are supported via --slicer=<slicer>:
slic3r: Slic3rslic3r-pe: Slic3r Prusa Editioncura-legacy: CuraEngine 15.04 with old profilescura: CuraEngine 3.x or laterprusa: PrusaSlicer
/usr/share/print3r/slicer/<slicer>/base.ini contains the base settings for a particular slicer.
print command converts, slices and sends the resulting Gcode to the USB port of your choice.
% print3r print cube.scad
% print3r --scad print 'cube(20)'
% print3r print cube.stl pyramid.obj
% print3r print cube.gcode
Part Preprocessing
All part-preprocessing operations can be used in combination of print, slice, preview and render command:
Placement
--random-placementplace print randomly on the bed to evenly use the entire bed--auto-centerplace print in the center (default)
% print3r print cube.scad
% print3r --auto-center print cube.scad
% print3r --random-placement print cube.stl
Multiply Part
--multiply-part=<n> multiply part(s)
% print3r --multiply-part=2 print cube.stl
% print3r --multiply-part=2 print cube.stl dodecahedron.stl
% print3r --multiply-part=2 preview cube.scad pyramid.stl
each part is multiplied, --multiply-part=1 is redundant.
Scale
--scale=<x>,<y>,<z>scale part x,y,z (absolute if ‘mm’ is appended)--scale=<f>scale part f,f,f
whereas each value can be:
<float>= multiplier, special case 0 = scale proportionally<float>% = multiplier in percent<float>mm = force to x mm absolute length and scale all axis set to 0 proportionally
% print3r --scale=2 preview cube.scad
% print3r --scale=200% print cube.stl
% print3r --scale=2,1,0.5 print cube.stl
% print3r --scale=20mm,0,0 print box.stl
% print3r --scale=20mm,2,1 print box.stl
% print3r --scale=300mm,30%,1 print box.stl
Rotate
--rotate=<x>,<y>,<z> rotate x,y,z where is each angle 0 .. 360 deg
% print3r --rotate=90,0,0 preview toy.scad
% print3r --rotate=90,0,0 print toy.stl
Translate
--translate=<x>,<y>,<z> translate x,y,z whereas each value in [mm], disables --auto-center and --random-placement.
% print3r --translate=-40,20,0 print cube.stlMirror
--mirror=<x>,<y>,<z> mirror x,y,z (0=keep, 1=mirror), the same can be achieved with --scale= by using -1 (mirror) and 1 (keep):
% print3r --mirror=1,0,0 print toy.stl
% print3r --mirror=0,1,0 print mount.stl
% print3r --scale=1,-1,1 print mount.stl
Slice
slice command converts and slices the model to Gcode file, best set --output=file.gcode to define the filename.
% print3r slice cube.scad
% print3r slice cube.stl
% print3r --output=cube.gcode cube.scad
% print3r --slicer=cura --output=cube.gcode cube.scad
% print3r --slicer=slic3r-pe --output=cube2.gcode cube.scad
Preview
preview command converts, slices and display the resulting Gcode with yagv Gcode viewer.
% print3r preview cube.scad
% print3r --slicer=cura preview cube.scad
% print3r --slicer=cura --printer=prusa-i3 preview cube.scad
% print3r --slicer=slic3r-pe --printer=ashtar-k-1 preview cube.stl pyramid.stl
Render
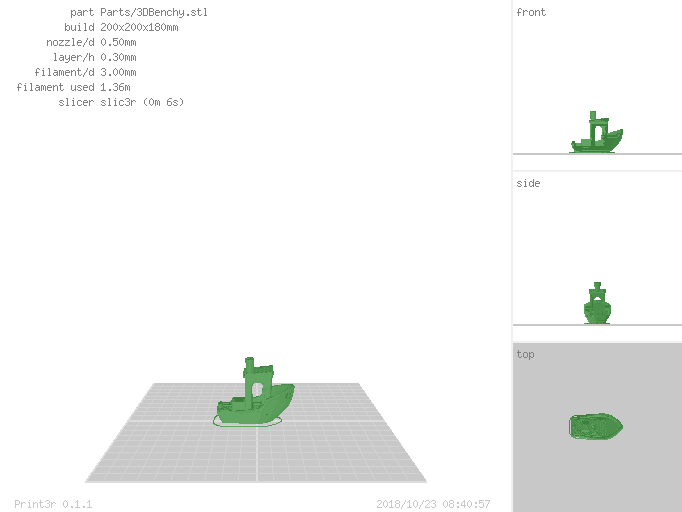
render command converts, slices and renders the resulting Gcode into a PNG image, best set --output=test.png to define the filename.
% print3r render cube.scad
% print3r --slicer=cura render 3DBenchy.stl
% print3r --slicer=cura --printer=prusa-i3 render cube.scad
% print3r --slicer=slic3r-pe --printer=ashtar-k-1 --output=set.png render cube.stl pyramid.stl
Gcode
gcode command allows to send Gcode in the command line directly:
% print3r gcode 'G28 X Y'
% print3r gcode 'G28 Z'
Gcode Console (gconsole)
gconsole command launches an interactive console to send Gcode and custom commands to USB connected printer:
== Print3r: Gcode Console (gconsole) - use CTRL-C or 'exit' or 'quit' to exit
   for valid Gcode see https://reprap.org/wiki/G-code
conf: device /dev/ttyUSB0, connected
>
Commands
- any valid Gcode line
- in
gconsole/commandsreside a few gcode script which simplify handling:home,homex,homey,homez,hx,hy,hz: homing all or individual axisleft <n>,right <n>move left or right (X-axis) relativelyup <n>,down <n>move up or down (Z-axis) relativelyforward <n>,back <n>move forward or back (Y-axis) relativelyx <n>,y <n>,z <n>move each axis absolutelynozzle <temp>set nozzle temperaturebed <temp>set bed temperatureoffturn everything off (motors, nozzle, bed)
> homex
send <G28 X>
-----
X:0.00 Y:0.00 Z:5.00 E:0.00 Count X:0 Y:0 Z:16000
ok
.
> right 10
send <G91>
-----
X:0.00 Y:0.00 Z:5.00 E:0.00 Count X:0 Y:0 Z:16000
ok
.
send <G1 X10>
-----
ok
.
> _
Download & Install
Visit https://github.com/Spiritdude/Print3r or choose the latest release.
More Information & Details
- Github: Print3r Wiki: the “official” documentation and in-depth examples
- My Blog with Print3r: on-going development with examples

 Orange Pi Zero